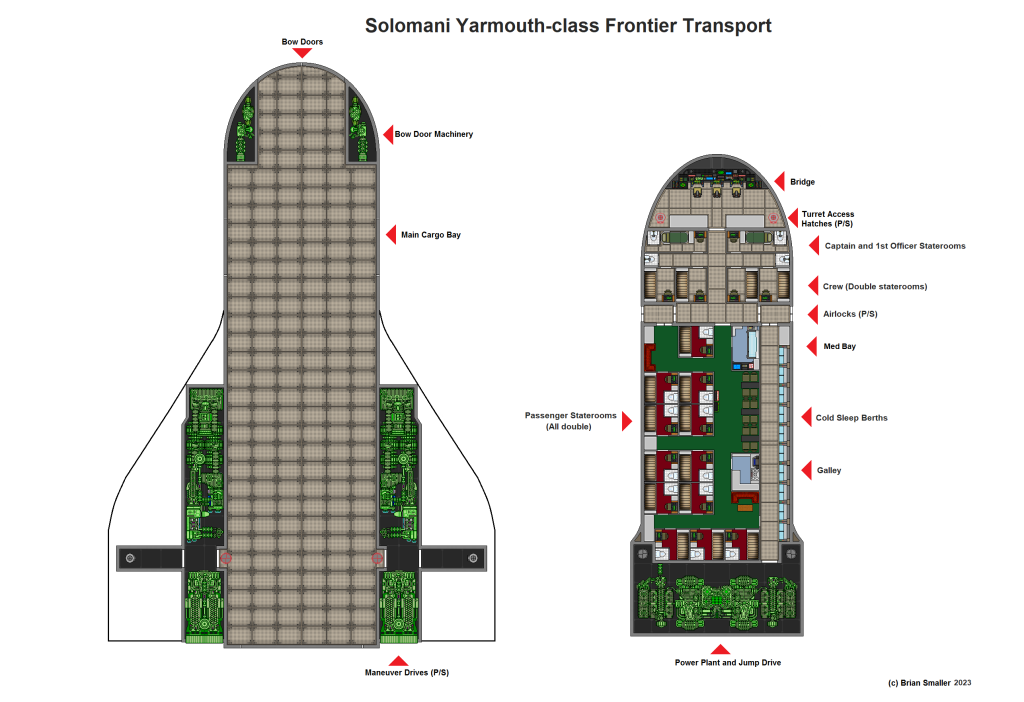
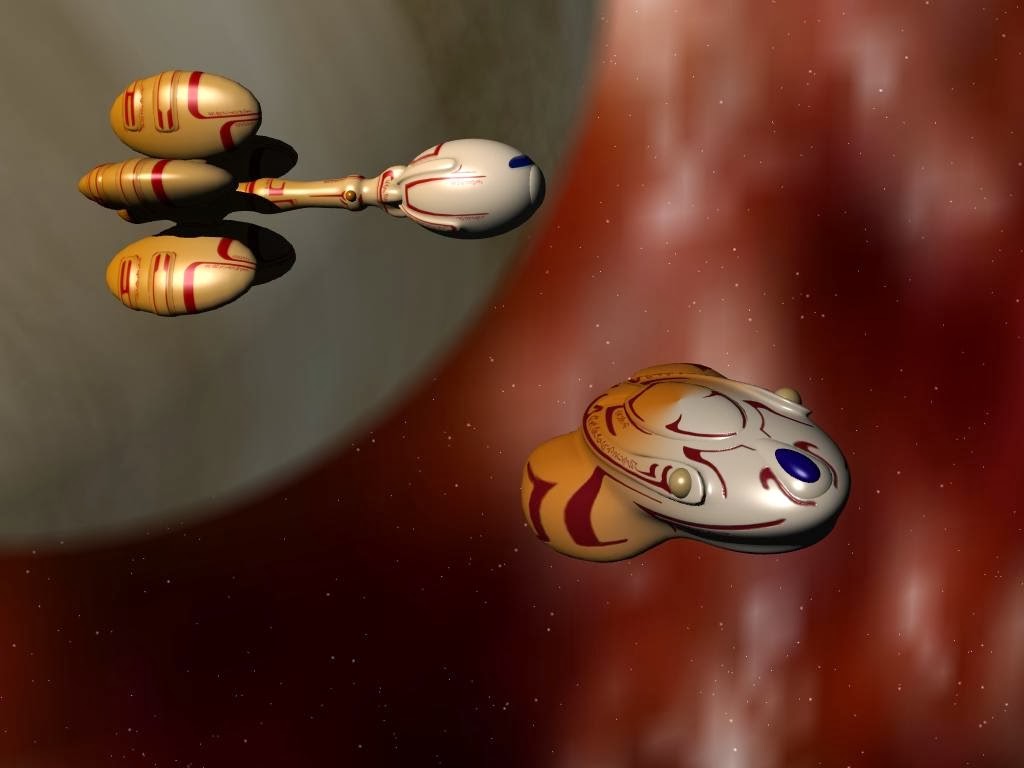
Solomani Yarmouth-class Frontier Transport (400tons)

This is a Solomani version of the Imperial Subsidized Merchant. It has Jump 2 capability and 1G acceleration. There is no High Passage available on this boat. Just middle and low. It can take 24 Middle and 20 Low passengers and has 147 tons of cargo space. Crew is 10 Captain, 2 Bridge, Engineer, 4 Gunners, a Steward and a Medic. The captain and 1st officer get their own staterooms but the other eight crew double bunk. This is a typical Solomani bare-bones transporter. Accommodations are cramped.

This ship was described in GURPS 101 Starships (by BITS).

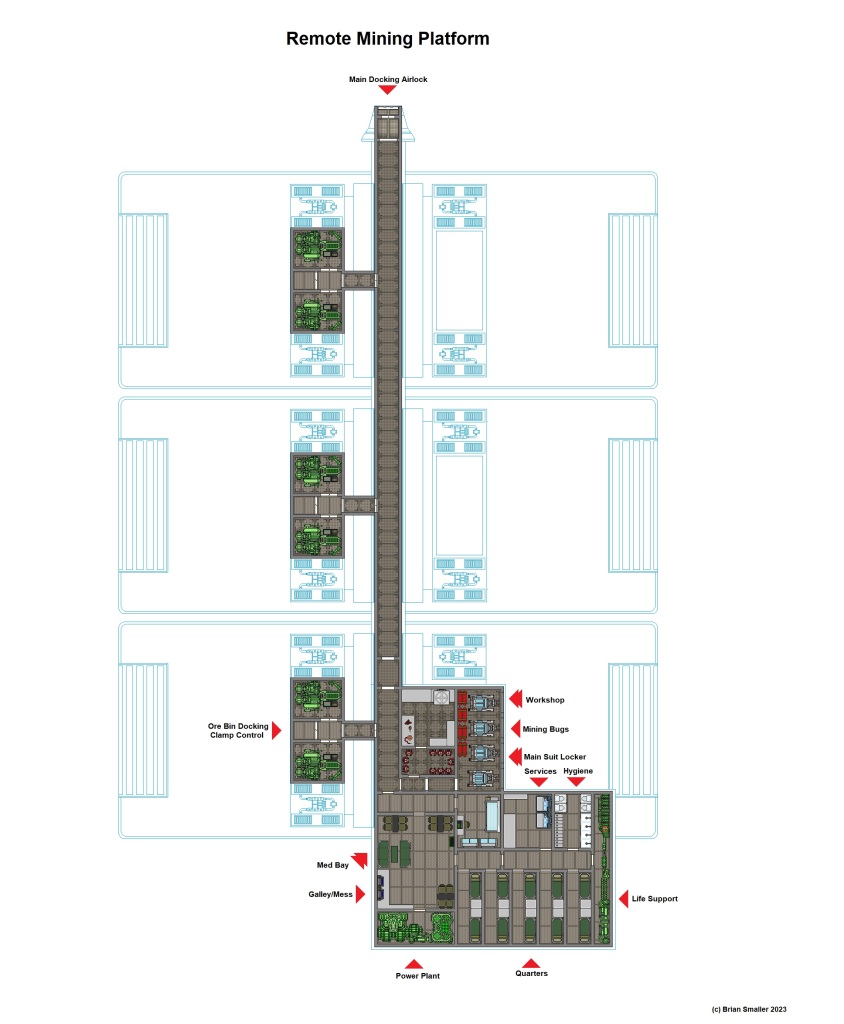
Remote Mining Platform

A mining platform towed out and left at remote belt locations. Ten miners live here for extended periods, with bi-monthly re-supply of life support and needed supplies. Mined ore is stored in three large ore bays that can be detached towed back to refinery platforms by the resupply ship.

There are four small mining “bugs” that have a laser drill and manipulators to gather ore and return it to the main platform for storage.

The platform has station keeping thrusters only.

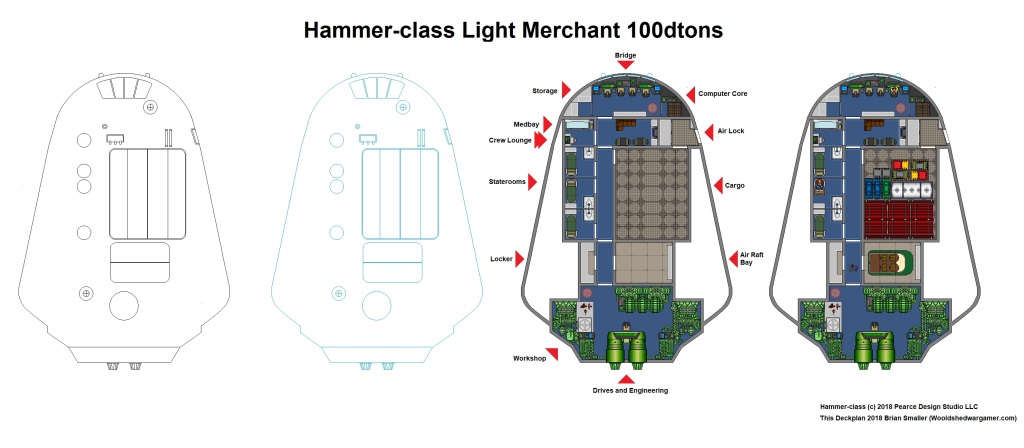
Hammer-class Light Merchant 100 Dtons

Four years ago I asked the designer of this ship if I could do a deck plan and he graciously said I could. I finally got around to doing it. Here is a link to the original post where you can find much Traveller goodness. https://travellerrpgblog.blogspot.com/2016/10/deck-plan-hammer-class-100-ton-merchant.html

Image (c) Pearce Design Studio. What an awesome little ship.

On to my version. I dropped the bridge fresher for more storage space. Never can have enough storage space be it in a house or a 100dton light merchant.

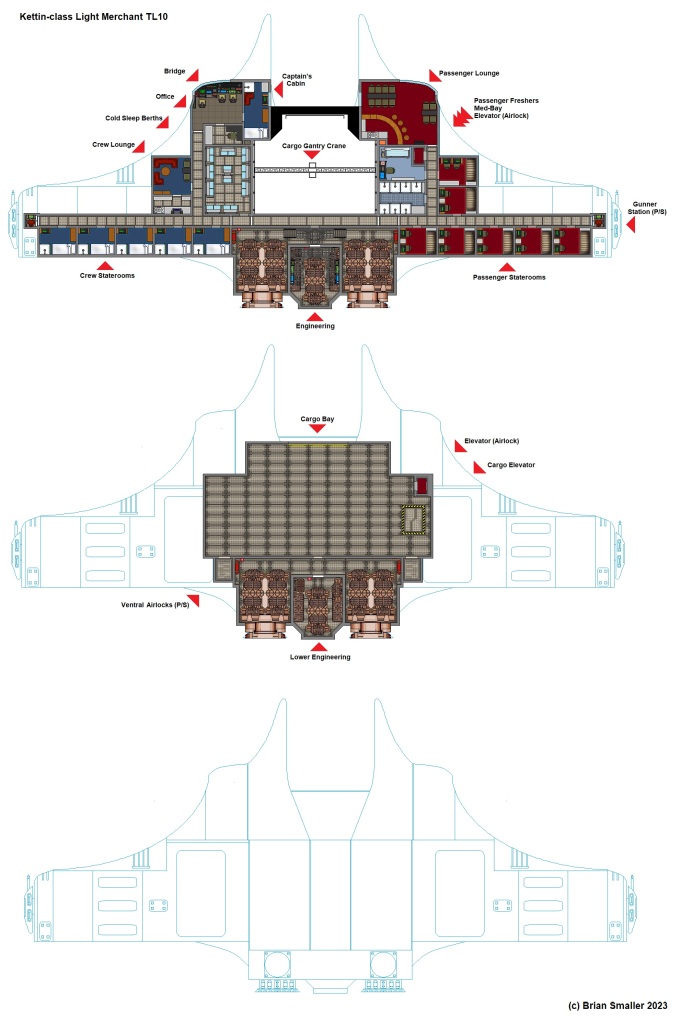
Kettin-class 200ton Merchant

Hi there. This deck plan is for a 200ton merchant ship. It is inspired by the Kettin-class in the Space Opera book “Seldon’s Compendium of Spacecraft Vol 1”. For Traveller it is basically another Far Trader. Jump 2, 2 G thrust.

Cyberpunk Red

I got a new RPG. Have not played Cyberpunk since the 90s when I used to GM Cyberpunk 2020. I like this new version. I liked it so much I actually brought the rulebook rather than done an eye-patch and put a parrot on my shoulder to acquire it.

A few new roles, new combat rules that speed up play and the setting moved on twenty years. This game is set in 2045.

My favourite Rules are the Rules.

  1. Style over Substance
  2. Attitude is Everything
  3. Live on the Edge
  4. Break the Rules

So, my players can expect a new campaign in the near future, Choombas.

Aslan Khtukhao-class Clan Transport

I did this deck plan many years ago. Based on the Art of Jesse de Graff and a plan in the GURPS Traveller Book.

Aslan Clan Transport (Traveller)

I have updated the deck plan to a newer look. Hope you like it.

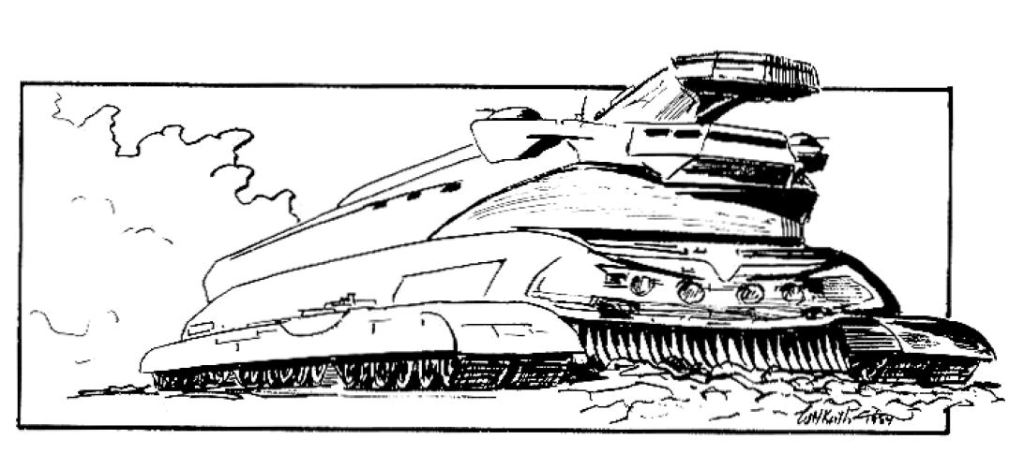
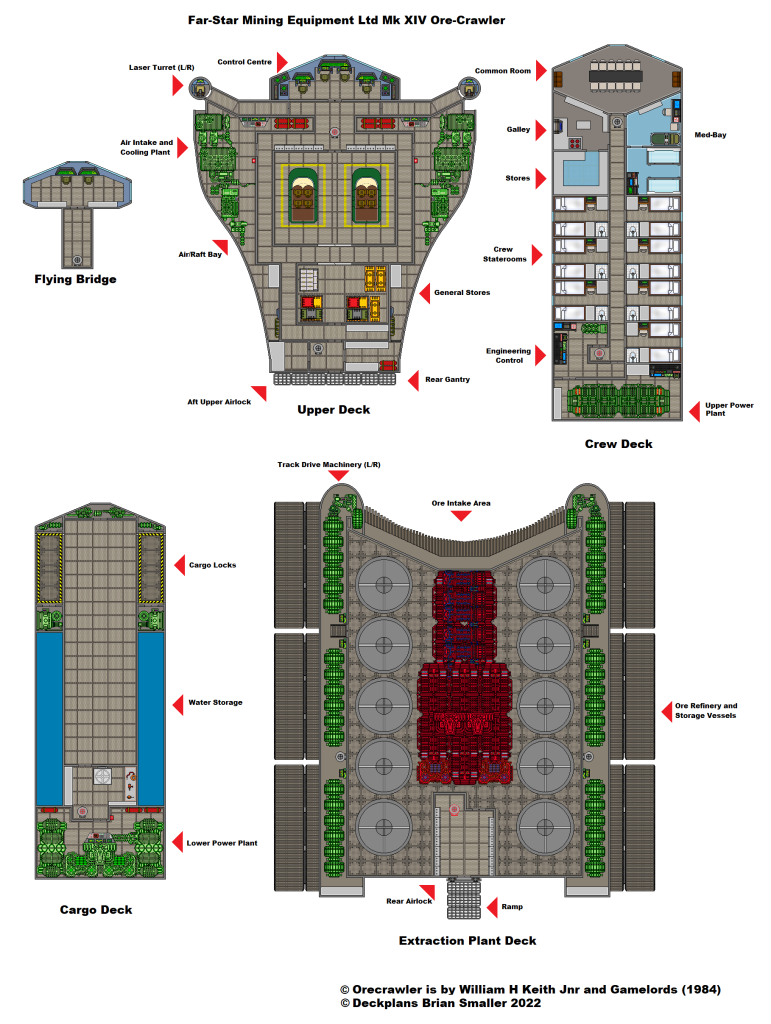
Ore-Crawler from Gamelords 1984 Adventure “Duneraiders”

My first Traveller deck plan in quite a while. This is from the 1984 adventure by Gamelords titled “Duneraiders” by the prolific Traveller writer and artist William H. Keith Jnr. I love his artwork – it speaks Traveller to me in so many ways.

Ore-Crawlers are large (approx 1200tons) designed to sweep up surface ore and refine minerals and metals from said ore. It has a powerful fusion engine that powers the drives and refinery equipment, and also has a limited grav assist to help negotiate soft sand and so forth. The vehicle is sealed and can operate in vacuum and hostile environments. These are common industrial machines and are manufactured under license across the Imperium.

For more information you will need to find a copy of the adventure Duneraiders. Where…I have no idea. Ebay, Noble Knight Games…..there must be some out there somewhere.

Full Size Deckplans


Battlefield Accessories 28mm ACW Gun Carriages.

If you have ever brought a box of Perry 28mm ACW Artillery you will know that you end up with a swag of spare barrels. There is a 12llb Napoleon, a 3″ Ordinance Rifle, a 12lb Howitzer and a 10lb Parrot on each sprue so at a minimum you will have nine barrels left over after making whatever artillery pieces you wanted.

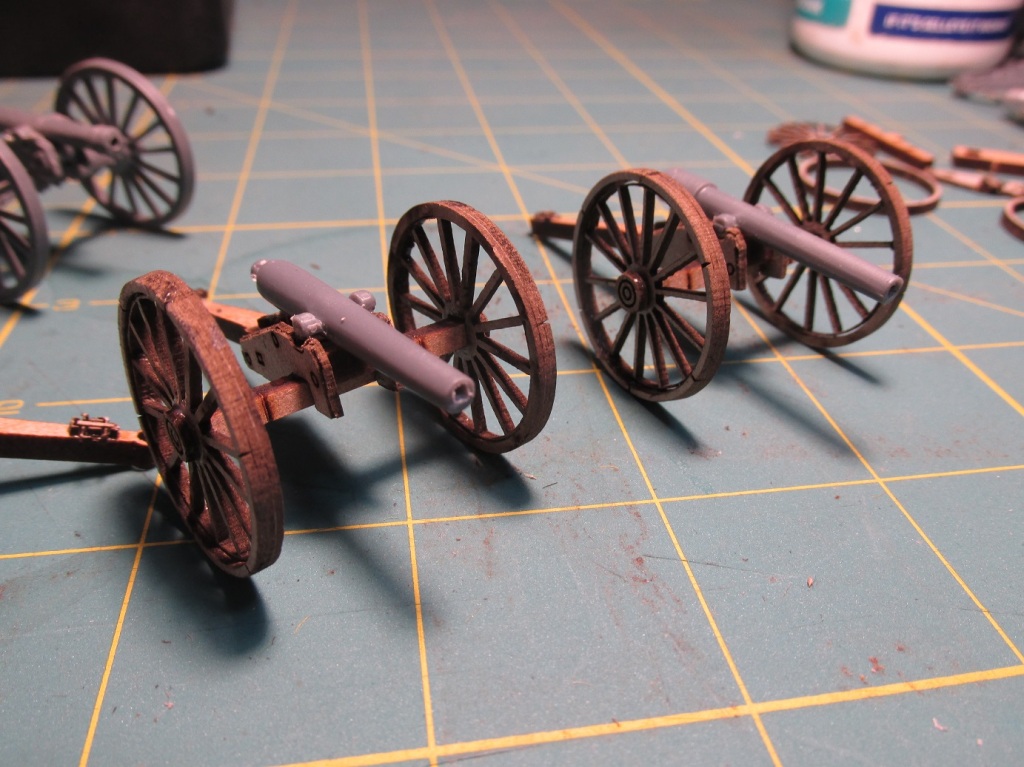
This guy in Australia, Battlefield Accessories solves the problem of what to do with those spare barrels with these handy-dandy laser cut gun carriages.

The set consists of enough parts to assemble three more carriages. The wheels and some other parts are cut from a stiff card, which the trail and crosspiece are cut from 3mm mdf. Wheels are three parts – the rim, spokes and the hub. All parts fit well and easily glue together. With the card parts, be careful when cutting them away from the ‘sprue’.

Assembly was simple. The only thing missing is an elevation screw. I used a piece of wire, the sort of thing most modellers have in their bits box somewhere I am sure.

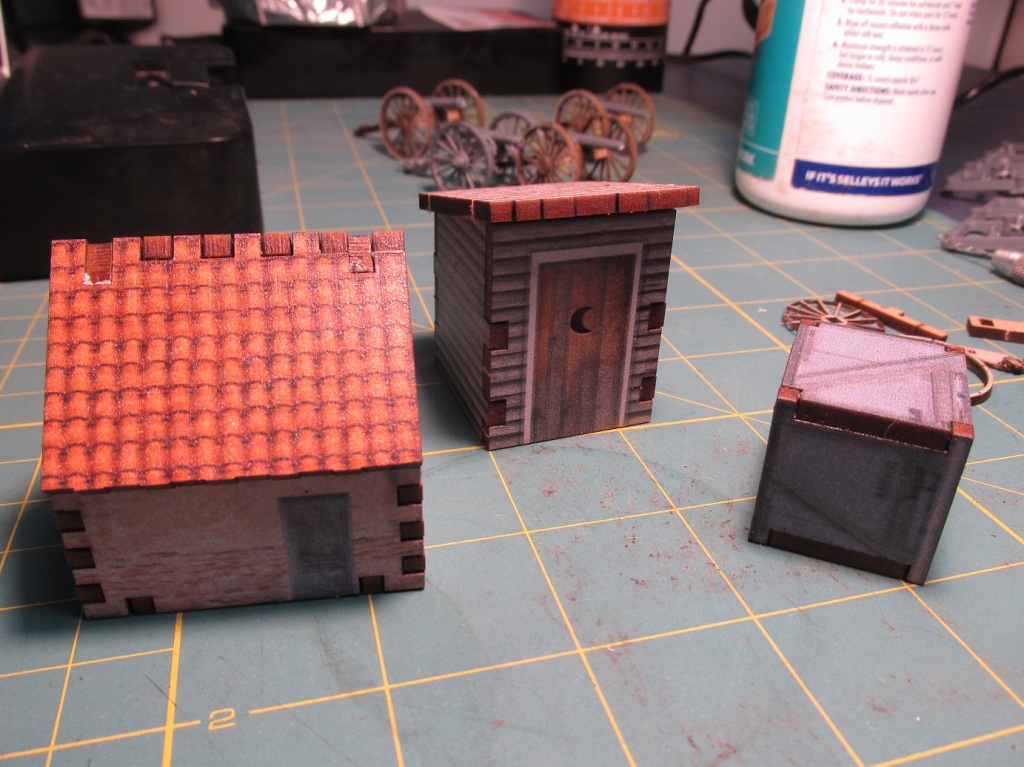
In the pictures below you can see that they match up perfectly with a Perry gun. Battlefield Accessories also included a sampler sheet with some other offerings. – a 28mm outhouse, a scifi type cargo container and a house – 15mm, I guess.

At this time of postage is not cheap. They almost doubled the price of these for me to get them from Australia to New Zealand but postage these days is what it is.

I will probably use these mostly for limbers. But I got enough to make nine more guns so I have options.

Get some of these if you want to increase your artillery park without having to buy extra plastic sets.

Roy Martin’s Homemade ACW Artillery Pieces 1/72nd scale

My friend Roy Martin from Wellington, New Zealand provided me with this excellent tutorial on making home-made ACW artillery pieces. Roy is a 1/72nd scale gamer and plays a lot of ACW and Napoleonics in this scale. Here is a link to a previous wargame report supplied by Roy.

Anyway, without further ado I present Roy’s ACW Artillery Tutorial.

Tutorial

Scratch Building an ACW 12 pounder ‘Napoleon’ Cannon in 20mm scale

By Roy Martin

After having had to make my own cannons for reasons I won’t go into, and having shared the photos of the end results with selected individuals who I thought would be interested, it was suggested that I create a tutorial on the making of them, so here goes nothing.

As both sides used these cannon as their ‘workhorse’, they are an easy option, with the only difference being that the Union used ones with barrel flares and the Confederate ones didn’t.

Materials Required:

A length of 19mm Dia. Conduit

Wire Paper Clips                 

Matchsticks

A length of 5mm Sq. Balsa                                

A length of 1mm dowel (the rod from an incense stick)

Some 1mm card                                                 

A length of 5mm plastic rod (an old knitting needle)

Some 2mm ball bearings (12 Gauge Shot is perfect)                                  

PVA Glue

The Wheels:

Start by cutting the length of conduit into 2mm rings either with a fine bladed hacksaw or if you are lucky enough, a modelling bench saw.  Then sand the surfaces smooth with a bit of old 60 grit paper– this can be hard on the fingers.

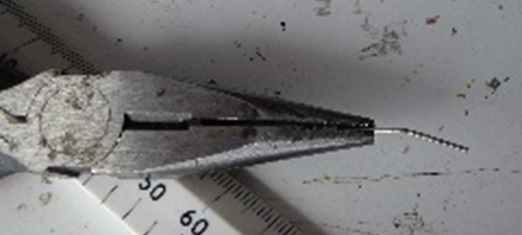
Next, take some wire paper clips and straighten them into a single length, which I do by using a pair of small pliers.  These will be the spokes, of which there are 4 lengths making an 8 spoked wheel.  To add any more spokes to the wheel is impractical, as it bulks out the hub area to an unmanageable and unsightly degree.  The first one should be cut to fit snugly inside the rim (in this case 14mm) and pressed into place (I use the end of my short needle nose pliers) with a drop of PVA to secure it.  The remaining lengths are cut about 1mm longer to allow for the slight bend required so that the subsequent spokes will surmount previous ones with the ends still fitting within the rim, and fitted in the same manner by pressing them into place.  The easiest way of applying the bend is simply to hold the wire in a pair of pliers at the half way point and apply a bit of pressure with your finger as it bends very easily.   The amount of bend you will learn by trial and error, but it isn’t much (see below).   Remember that they need to be a tight fit so when you cut them, if necessary be generous – as they say, there is a taking off tool, but not a putting on one.   You will need to install them from alternate sides of the wheel, so as to balance the fitting process and the look of the finished wheel.

When this is completed (and you have stopped cursing me) the centre of the spokes can be filled with modelling ‘bog’, or I prefer to just add PVA drop by drop letting each drop dry before adding the next.  When all this is done then the wheels can be glued to the axle, being a 20mm length of matchstick.

The Carriage:

This is the easy bit as they are a single trail unit.  Start with a 5mm Sq. length of Balsa (or similar) cut to 40mm.  This need to be trimmed down to 3mm for height and slightly rounded for the end on the ground to create the ‘skid’.  From about 12mm of the other end, take a short (5mm) length of 1mm dowel make a small hole (a thin nail will do if using Balsa) and press through the trail to sit proud on the top side – this will be the adjusting screw under the barrel.  At about 8mm from the ‘skid’ end, take about 22mm of the same 1mm dowel and once again make a guide hole and  push through the trail at an acute angle so that it will poke out rearwards by about 18mm – this will be the ‘laying lever’ which both armies left permanently attached during combat.

The Barrel:

This is easier than it first appears.  First acquire a length of 5mm plastic rod (don’t just steal one of your wife or mums knitting needles as you will quickly learn a new meaning to ‘pain and suffering’).

I then mark a 25mm length and clamp the rod in a vice (using something to ensure the rest of the rod isn’t damaged by the vice teeth e.g. some thin bits of timber), with what will be the filed end closest to the vice allowing a bit of space for working the file.  I use a small half round 2nd cut file by preference (but it’s up to you).  You then have to slowly file a taper onto the rod leaving the far end at 5mm and the other tapered down to 3mm.  This is where you have to take it easy, as it is SO easy to over file one spot, as you have to file a bit; turn the rod and file another bit, and so on, until you are happy with the result, or are once again cursing me.  In the case of the union barrels, you need to allow a few mm at the end for the barrel flare (this is why I use the half round file) which should be about 4mm Dia.  Once you are happy (well sort of) then carefully cut the barrel off with a fine bladed hack saw (and try not to lose it on the floor amongst the rubbish!).

From here, all that is required is to carefully sand or file the ‘breech’ end of the barrel to a rounded state, leaving a small flat area at the end.  The final touch for the barrel is the addition of a 2mm ball bearing (or a piece of 12 gauge shot if you have it) glued to the breech end as the finial.

Construction:

As if you really need to be told this.  Glue the axle and wheel assembly to the underside of the head of the carriage trail.  Paint the carriage and barrel at this point.  Glue the barrel in position with the breach end just past the ‘adjusting screw’.

Accessories:

The water bucket is simply a 5mm offcut from an old piece of 2mm model sprue.

The ammo box is just made from 1mm card, and is 10mm (w) x 8mm (d) x 5mm (h).  It has a packed out base and holds 6 x 2mm ‘cannon balls’ (or 12 gauge shot), with a lid 12mm x 8mm.

If you would like to download a PDF you can do so here.

The Woolshed Wargamer

Wargaming and Roleplaying in the wilds of rural New Zealand

Science Fiction Art by David C. Mueller / dcmstarships

Copyright 2024 - No part of this blog may be used without the permission of the artist.

Hutt Miniature Wargames Club

Tabletop gaming in the valley

ARSM wargame Roma

Club di wargame e boardgame, a Roma dal 1976

Comrade's Wargames

Painting toy soldiers in Oregon

Northport

adventures in designing a GURPS Dungeon Fantasy setting

Compromise and Conceit

Infernal adventuring...

Vector movement

...and other heady stuff

Tracks and Threads

My Wargaming Blog

Pacific Paratrooper

This WordPress.com site is Pacific War era information