I am away from the Woolshed for nine days – down in Wellington for work. I have delved into the past to find an article I wrote that first appeared on the Kapiti Fusiliers website (now sadly defunct). Anyways, without further ado…
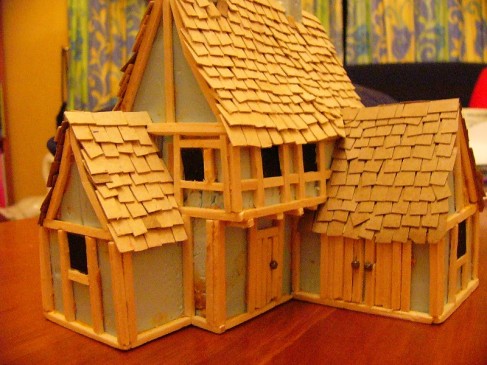
Some time ago I brought a couple of pre-painted Conflix 25mm buildings. They are a little fantasy-ish for many people’s liking but I found them to be exactly what I wanted for my Bretonnian village. I wanted an entire village but thought the cost may have been a little prohibitive so decided that I could make something similar. Here are the results.
I used high density insulation polystyrene for the body of the building. Six months ago I got a 2.4m x 0.6m sheet for NZ$30. Styrofoam is manufactured by Dow Chemicals (in Saudi Arabia) and is available just about everywhere. So far the sheet I brought has built a model Stonehenge, a 28mm Fantasy castle and now two houses and I still have three quarters of it left. For the roof and shingles I made do with card from old note books. Wood was balsa scraps (I never throw anything away and keep all those little pieces left over from basing my figures). For glue I used PVA and Selleys No-More-Nails. The only paint I brought especially for this project was a small test pot of a terracotta colour from the local hardware store for NZ$4.00.
First thing I did was do a few sketches to get an idea of what I wanted to build. In this case I used the Conflix building as a guide for overall size and the angle of the gable. Then I cut the polystyrene into the basic house shape I had decided upon and glued together with No-More-Nails. I do not have a hot wire foam cutter so use a box cutter knife to fashion the styrene instead. You just have to be careful that you don’t pull the blade through the foam or it will pull and not cut cleanly. I used toothpicks to pin the pieces together and to provide support while the glue dried. I cut roof sections from card and glued them to the gable ends.
Then I cut balsa into strips and glued it around the body of the house to form all exterior beams, door and window frames. Door handles were made by using small panel pins pushed into the styrene leaving the head exposed.
Now the really boring bit. Cut 5mm strips from thin card – I used the backing off old note pads. Then snip them to make 5mm x 8mm tiles. You don’t have to be that accurate, just make sure that they are all about the same size. Starting at the bottom of the roof, glue a line of tiles down. Continue doing this up the roof until you reach the ridge. Do the same on the other side of the gable and you just need to glue some capping pieces along the ridge.
I had tried to find some wire mesh of about the right size to use as lead light window panes but could not find anything around the house or for a reasonable price at the hardware store. So instead, I glued card into the window openings with the intention of just painting the lead lights later. At this stage the construction phase of the project was finished.
Now it was time to add a bit of texturing. All I did was smear some Selley’s No-More-Gaps on the wall with my finger. Any excess that got on the timber beams can be trimmed off later before painting. For the chimney, I cut a small rectangular piece of foam about the size I wanted. Then I cut a notch for it to fit onto the roof and glued it in place with No-More-Nails. When it was dried I shaped i with craft knife and then etched the stone shapes in with a pencil.
Now the building is finished it is time to paint. Although it is tempting to spray paint the model, unless you have an airbrush I would not recommend it as a way of applying the first coat. The solvents in the spray paint do a fine job of dissolving polystyrene. So, the best thing is to apply a coat of paint over all the exposed styrene first with a brush. After that you can happily spray coat the rest of the building. I used a can of black automotive spray undercoat.
I wanted my building to look like the Conflix ones that I already had, so I painted and dry-brushed the walls grey, the timber beams using GW Vermin Brown and the tiles with a terracotta house paint to match. The results do not look too shabby.
The finished product (right) standing alongside its Conflix counterparts.


Good work,
I made the masters for the Conflix models many years ago, when I ran Wargames World. The windows on the originals were made from etched brass mesh from Scalelinks.
I design laser cut medieval castles now, and will be making some laser cut kits of buildings similar to these shortly (but with interiors this time).
Cheers, chris
LikeLike
Hi Chris. Really nice to hear from you. Thanks for leaving a comment. I like the Conflix buildings and have got most of that series now. Did you design them based on any real buildings or just wing it? I hope you subscribe to the ‘imitation is the sincerest form of flattery’ idea 🙂
LikeLike